There’s no denying the opportunities surrounding Amazon when it comes to eCommerce. But it’s competitive and sometimes, hard to stand out.
Without a distinct space, your brand voice can get drowned out, and your products overlooked.
Sellers who are ready to elevate their brands, get in front of more customers, and distinguish themselves from their competitors, have a huge opportunity in launching an Amazon storefront.

Why Create an Amazon Storefront?
Creating an Amazon storefront can offer multiple benefits for your brand. Here are some of the top reasons why you should be setting up your own store on Amazon:
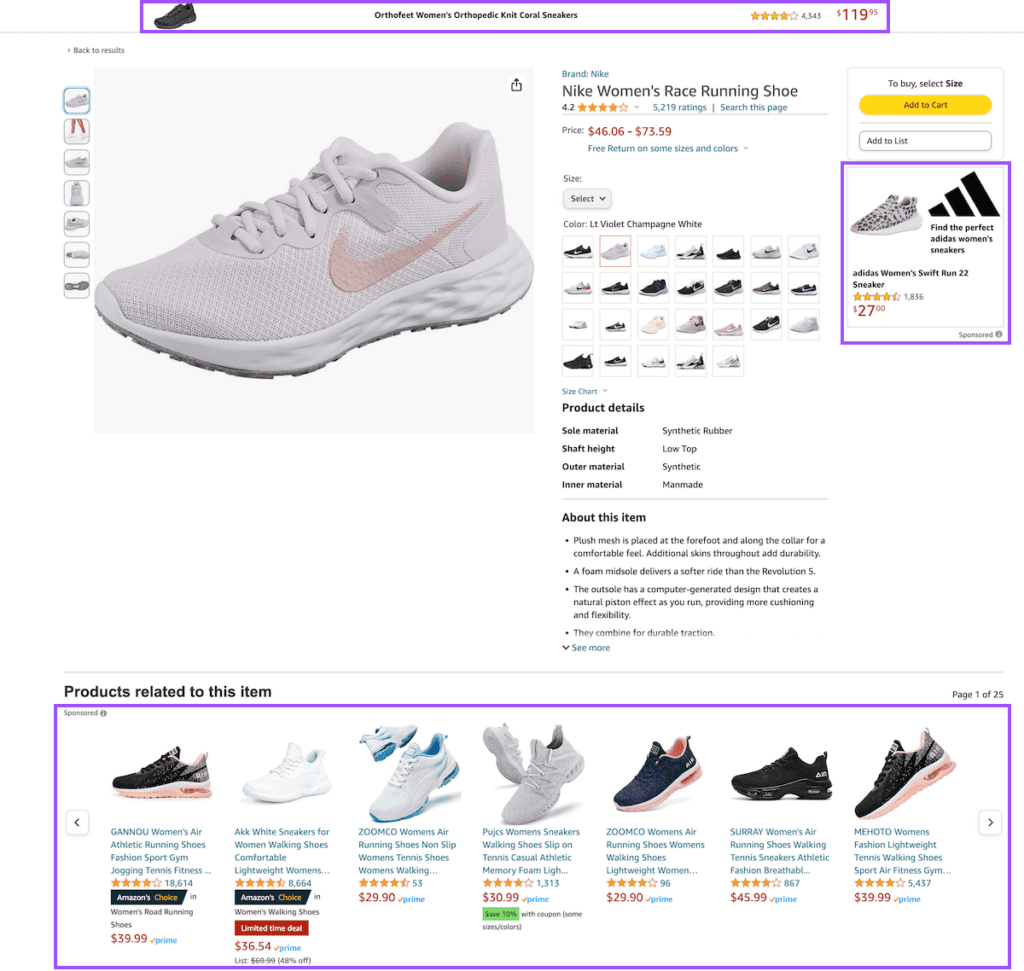
- No competitor ads: Unlike traditional product listings, an Amazon storefront is free from competitor ads. Meaning that when a customer clicks on your product, they’re not bombarded with ads from other sellers. This not only enhances their shopping experience but also ensures that you’re not paying for clicks that result in a competitor getting a sale. Just look at how many competitor ads are shown for this pair of Nike trainers:
- Increased perceived value: An Amazon storefront can significantly elevate your brand’s image. It gives your brand a professional look, setting you apart from competitors who don’t have a storefront. This enhances your brand’s perceived value and puts you in the ranks of the big brands your customers know and love.
- Branding opportunities: A storefront gives you more freedom to showcase your brand’s personality. Unlike a standard product listing, a storefront allows you to use more lifestyle images, branded content, and product images – connecting with your customers on a much deeper level.
- Drive traffic to your storefront: By having a dedicated storefront, you can direct traffic straight to your store, bypassing the distractions of a typical product page filled with competitor ads. This can help increase conversions and boost your profits.
- SEO benefits: An Amazon storefront can show up organically in search engines like Google. This means that customers searching for products like yours could land directly on your storefront, increasing your visibility and potential sales by completely bypassing the Amazon search results.
Scaling as an Amazon seller can mean risky business
While you’re leveling up your brand, make sure you’ve got the right product liability protection with pay-as-you-sell coverage from Assureful – the eCommerce insurance specialist.
Premiums as low as $26/month
Amazon Storefront Requirements
Before you dive into creating your storefront, it’s important to understand that not every Amazon seller is eligible to set one up. You need to meet a few key requirements:
- Professional seller account: To create a storefront, you need to have a professional seller account. This means that the free individual accounts are not eligible for setting up a storefront. If you’re serious about selling on Amazon and enhancing your brand’s presence, upgrading to a professional account is a worthwhile investment.
- Amazon Brand Registry: Enrollment in Amazon Brand Registry is another crucial requirement for setting up a storefront. The Brand Registry program helps protect your brand from counterfeiters and gives you more control over your product listings. Enrollment comes with its own set of requirements so head to our guide on getting brand registered for more.
So, you’ve got your professional seller account that’s brand-registered. Now, it’s time to roll up your sleeves and start creating your Amazon store.
Here’s a step-by-step how to make an Amazon Storefront:
Step 1: Create Your Store
First, log into your Seller Central account.
Next, navigate to the “stores” section. This is where you’ll find all the tools you need to create and manage your Amazon store.
If you have multiple brands, now’s the time to decide which one you want to create a store for. Remember, each brand has its unique strengths and target audience, so pick the one that you think will benefit the most from having its own storefront.
Once you’ve made your choice, click on “Create Store“.
Step 2: Enter Your Brand Information
You’ll be prompted to enter some information about your brand. This includes your display name and brand logo.
Your display name is the name that customers will see when they visit your storefront. It should be the same as your registered, trademarked brand name. Avoid adding any extra phrases like “shop now” or “LLC”.
Next up is your brand logo. Your logo is a key part of your brand identity, so make sure it’s high-quality and represents your brand well. Amazon recommends a logo size of 400×400 pixels for optimal display.
Your brand information is the first thing customers will see when they visit your storefront, so make sure it’s a true reflection of your brand and what it stands for.
Step 3: Build Your Homepage
Now that you’ve entered your brand information, it’s time to start building your storefront homepage. This is where your customers will land first, so optimizing it to be visually appealing, engaging, and informative is well worth your time.
First off, fill in the page meta description. This is a summary of your page that appears in search engine results. Remember, Amazon storefronts can show up in Google search results, so make sure your meta description is catchy, keyword-rich, and accurately describes your store. It’s best practice for your meta description to be between 150-160 characters or around 920 pixels.
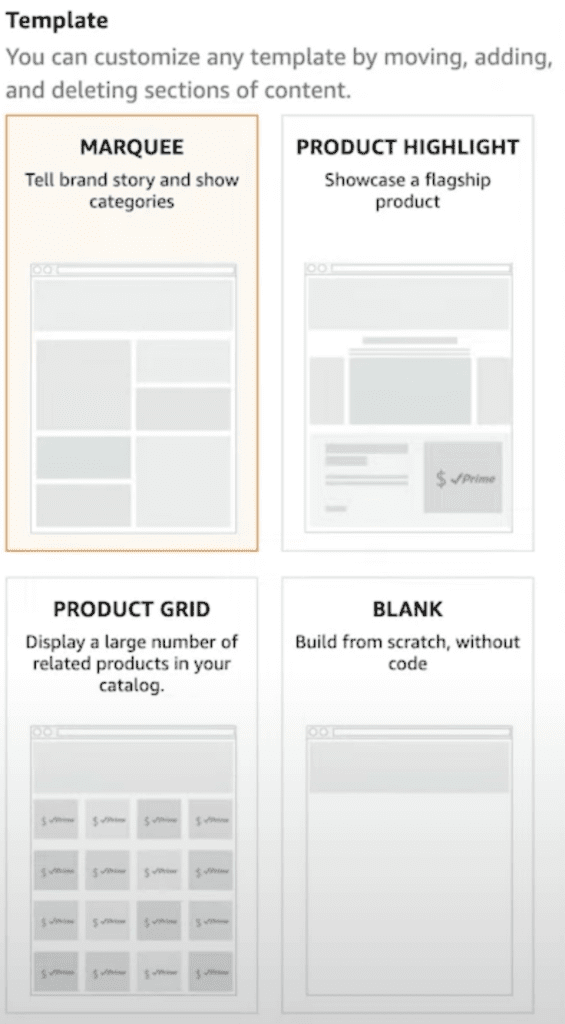
Next, Amazon gives you some page templates to choose from. Here, you need to consider the purpose of your store. There are a few options:
- Marquee: Perfect for telling the story of your brand. It allows you to showcase your brand’s personality and values.
- Product Highlight: If you have a flagship product that you want to showcase, this is the template for you. It allows you to highlight a specific product and its key features.
- Product Grid: If you have a large number of products, the Product Grid template allows you to display them in an organized and visually pleasing way.
- Blank: If you’re visualizing a storefront homepage that doesn’t fit into any of the templates and want to build out your homepage from scratch, you can choose the Blank template. This gives you complete control over your homepage design.
Step 4: Build Your Storefront Header
Start by clicking on the header where you see your logo. Amazon will prompt you to upload a header image. The recommended dimensions for this image are 3,000 x 600 pixels.
This space is your canvas to visually engage visitors and reinforce your branding. You can use a high-quality image of your products, a lifestyle image that represents your brand, or even a custom graphic. The key is to choose an image that aligns with your brand’s aesthetic and appeals to your target audience.
Remember: First impressions count, so spend the extra time getting this right
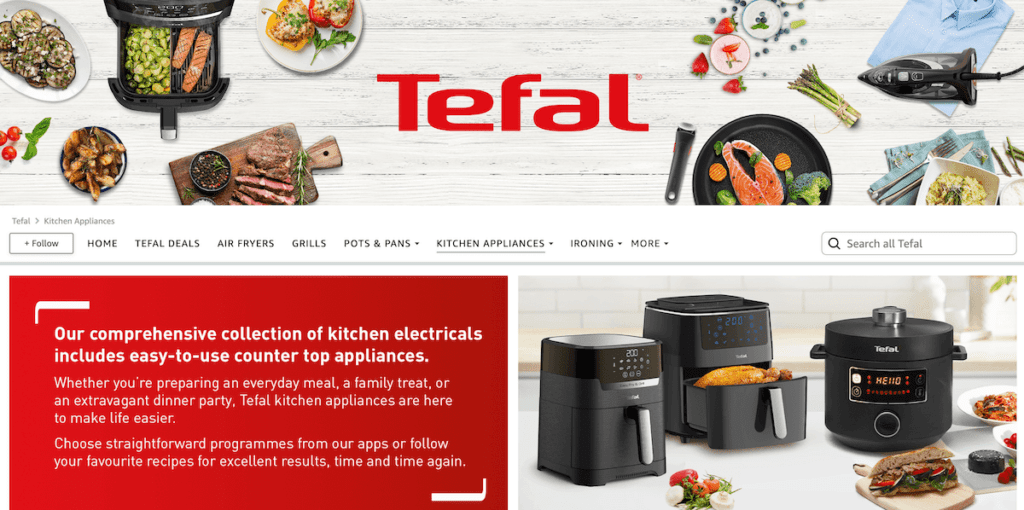
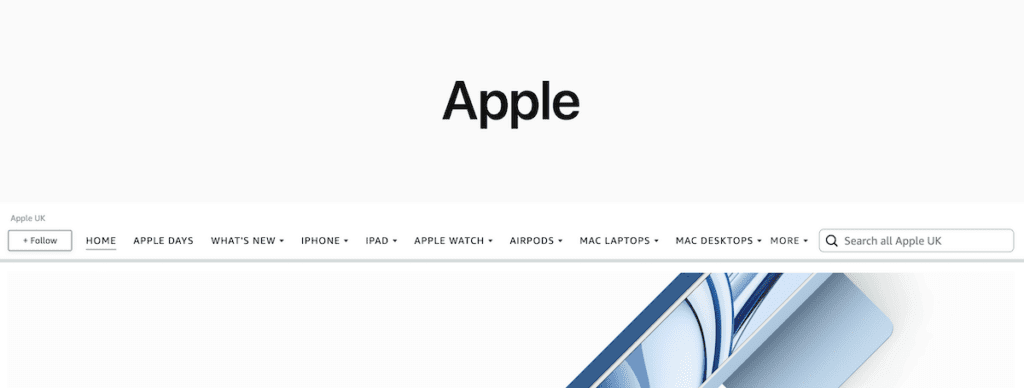
Here are some examples from big brands for some inspiration:
Amazon Storefront Examples
Fitbit

Tefal
Apple
Step 5: Design Your Homepage
With your header in place, it’s time to dive into the heart of your storefront and design the rest of your homepage.
Now it’s time to use the store builder. To start, click on each tile in the middle of the screen.
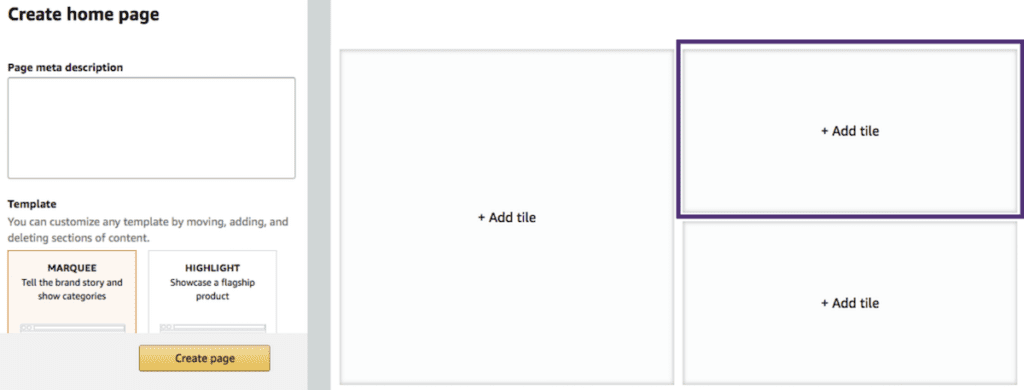
You can populate each of the tiles with a variety of content, including:
- Your products: You can link directly to your product pages by entering the product ASIN
- An image: Use high-quality images to visually showcase your products or brand
- An image with text: This allows you to add a brief description or caption to your image
- A shoppable image: This is an image that customers can click on to purchase the product shown
- Text: Use this to provide more information about your brand or products
- Video: Videos are a great way to engage customers and showcase your products in action
- Background video: This can add a dynamic element to your homepage and make it more visually appealing
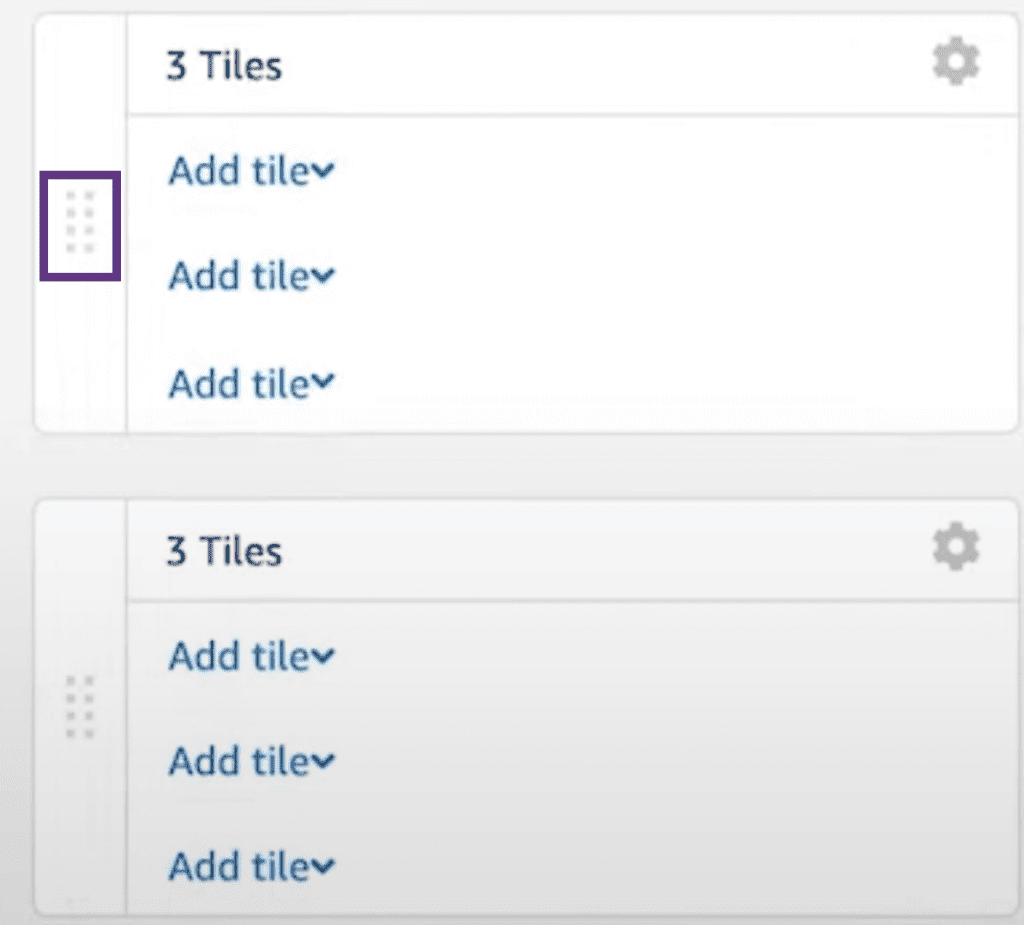
To add new sections, simply click ‘add new section’ or to rearrange sections on the page, click, drag, and drop the section you want to move.
Tips for the Best Storefront Success
Every element of your homepage should align with your brand, serve a purpose, and distinguish you from your competitors. Consider your customers’ journey, why they’re searching for your products, and what they need to see from your brand to hit the buy button.
Here are some tips to help you optimize your Amazon storefront for more sales:
- Include ASINs in Images: Whenever you add an image, make sure to include the ASIN in the required field. This allows users to click on the image and go straight to the product page rather than having to search through your store to find the product.
- Be Creative: Don’t be afraid to think outside the box when designing your storefront. Remember, shoppers may be comparing your storefront to competitors. Find a way to stand out and make a lasting impression.
- Customer-Centric Copy: When writing copy for your storefront, focus on the customer. Instead of just stating the features of your products, highlight how they can benefit the customer. Leading with benefits in this way makes your products more appealing and increases sales because you’re getting to the heart of what your customers are truly searching for.
Step 6: Adding New Pages
Your Amazon storefront isn’t limited to just a homepage. You can add new pages to provide more information about your products or brand. Here’s how:
On the left-hand side of the screen, click “Add Page“. You’ll need to input key details, choose a template, and design your new page following the same process you used to create your homepage.
This new page will now show up in the navigation below your header image.
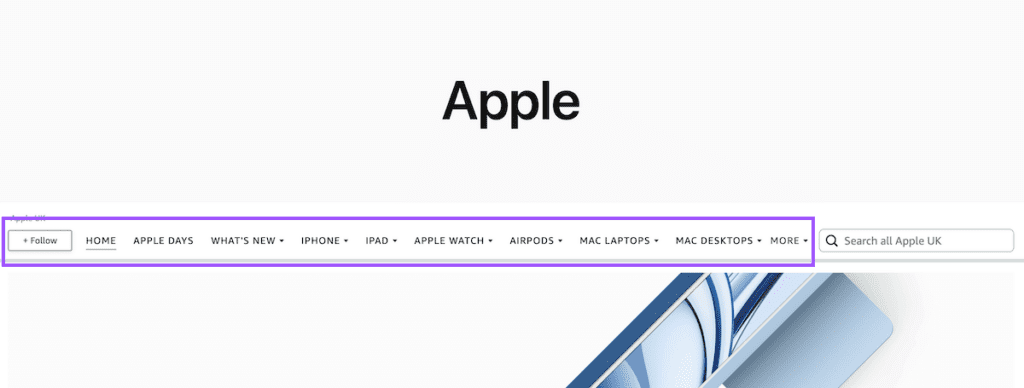
Whether it’s a dedicated product category or an ‘About Us’ page, make sure any new pages are informative and align with your brand.
If you have a large catalog of products, you can use the dropdown feature to categorize products within sub-categories. This makes it easier for customers to navigate your storefront and find what they’re looking for. It’s also a great way to display listing variations side by side so that your customers can easily compare products.
Step 7: Preview
Once you’ve put together all the elements of your storefront, it’s time to preview your work to ensure everything looks and works as it should before you submit it for publishing.
Here’s how to do it:
To preview your storefront, simply select “Preview” from the dropdown menu.
Start by checking for any grammar issues, spelling mistakes, or image inconsistencies. These small details can make a big difference in how professional your storefront looks.
Next, check that all the navigation works as it should. Make sure any images click through to the product page as intended, and that all links and buttons are functioning correctly.
Don’t forget to preview your storefront on both desktop and mobile devices. With more and more people shopping on their phones, it’s crucial that your storefront is optimized for mobile devices as well.
And remember, your Amazon storefront is a reflection of your brand. It’s worth taking the time to make sure everything is perfect before you submit it for publishing.
Step 8: Submit for Publishing
Once you’ve previewed your storefront and are happy with the look, feel, and functionality, it’s time to submit it to Amazon for review. Here’s how:
Hit “Submit for Publishing” to send your storefront to Amazon for approval.
The review process usually takes around 24 hours, but it could take longer depending on Amazon’s review queue. So, be patient if it takes a little longer.
Once approved, your storefront will be live and ready for customers to start visiting!
Creating your storefront is just the beginning though. As your brand and product catalog evolve, and customer behavior changes, you need to continually optimize your storefront, monitor its performance, and adjust your strategies to continue to generate maximum sales.
Want to read more in our Amazon Scaling Series? Check these out:
- Protecting your brand with Brand Registry
- Accessing the Amazon Vine program
- Mastering Amazon seasonal products
- Going global – how to leverage Amazon’s Global Selling Program
- How to get Amazon Seller Badges


0 Comments